after some trial and error here my log how to setup Linux as dualboot on my brand new msi gs70 with Win8 and Raid-setup. basically i did this:
- repartition to get free space
- change bios uefi settings
- setup ubuntu 12.04.3 64bit
- fix grub
- change bios uefi settings
- setup ubuntu
Status:
working: dual boot with grub. booting ubuntu 12.04.3 64bit, wifi, X with intel, Suspend, Sound, Touchpad, Ethernet, Optimus with Bumblebee...not working yet: SDcards, Camera, External Displays (possibly with manual xorg-setup
please comment if you have some hints or solutions
0. preparations
i did the Bios upgrade first. boot Win8 and get the right Bios (if you have a win8-raid setup choose "version 707") http://www.msi.com/product/nb/GS70-STEALTH.html#download. extract and startup the FLASHWIN64.bat1. repartition to get free space
i installed EaseUS Partition Master (free version here: http://www.partition-tool.com/landing/home-download.htm). and changed the C: partitions Size. besides i removed the partitioning of the Second Drive. Partition C: resized to 100GB (101946.3MB)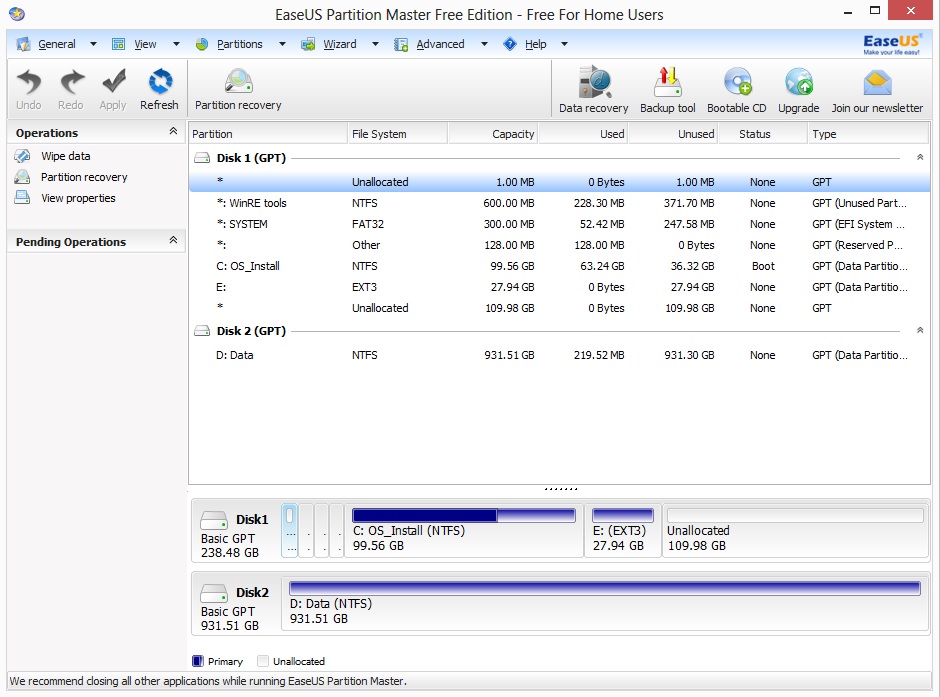 |
| here after the linux setup. so the E: you dont have, but much more unallocated space. |
get the 10.4.3 64bit iso (http://www.ubuntu.com/download/desktop/questions?distro=desktop&bits=64&release=lts) and copy it with "pendrive usb installer" to a usb stick (at least 1GB size) like described here: http://www.ubuntu.com/download/desktop/create-a-usb-stick-on-windows
i just took "try unlisted linux iso" and selected the downloaded iso and the right usb-drive.
NOTE: maybe there is a way to delete some stuff inside win8 to get its partition even smaller... i'll check this later on somewhen.
2. change bios uefi settings
restart Machine. when seeing the msi logo press DEL several times. inside Bios change the settings:- Boot mode select: legacy
- Fast boot: disabled
- maybe you need to change the boot order below also, but i'm not sure if its really needed
 |
| should look like this for "Fast Boot" and "Boot mode select" |
3. setup ubuntu
press F11 while msi logo shows up and then select your usb device.you should then see a grey-screen with some icons at the bottom, just press enter and start with the setup directly...
if it asks your "installation type" choose "something else" so you can choose which partition. i selected the free space after "/dev/mapper/..._Volume1p4" then "add" and added an ext4 partition with "/" as mountpoint. i did not add any swap, but if you want do so.
the trickiest part was what device to use to install the bootloader. after some trials it seems like it might be best to use just Volume1p1 as one needs to fix grub anyway. actually i dont know which one i've taken in the end, as it just came up again telling me to chose the right one. which i had to do several times...
seems like ethernet is not working, so i had to use wifi. at top right there appears the wifi-radar sign and it should be possible to use your wifi with it. at least here it worked.
4. fix grub
press F11 while msi logo shows up and then select your usb device. boot into live preview modus of your usb-stick to repair grub.i connected via wifi as ethernet was not working. then open a terminal (mouse left-top corner -> terminal) and enter:
sudo add-apt-repository ppa:yannubuntu/boot-repair && sudo apt-get update
sudo apt-get install -y boot-repair && (boot-repair &)
then just hit "recommended repair". if it asks you to paste something in the console do so (mark -> ctrl+c, terminal -> ctrl+shift+v)
5. change bios uefi settings
just revert the setting changes from 2.- Boot mode select: UEFI
- Fast boot: enabled
6. setup ubuntu
HINT: something went wrong and i dont get the login-screen, but ubuntu itself is running. get into a shel with CTRL+ALT+F1, and login. at least here i still was connected with the wifi i configured during installer.for the intel grafic i then did this (i hope i did not forget anything, as i had a long way to go):
sudo add-apt-repository ppa:ubuntu-x-swat/x-updates
sudo apt-get purge nvidia-* bumblebee
sudo apt-get --purge autoremove
sudo apt-get install virtualgl linux-headers-generic vim xinit
startx
i use "gnome" desktop (switch at the login screen with icon next to your name), as unity2D tend to eat more than half the cpu here. maybe i need to recheck the grafic-card and stuff. but this way i can at least really work...
i use synaptiks to configure the touchpad:
apt-get install kde-config-touchpad
then startup "synaptiks" and configure it like this:


here some of my other tweaks (remove ubuntu-one, empathy, get the normal scrollbars back)
apt-get remove ubuntuone* empathy overlay-scrollbar
echo "export LIBOVERLAY_SCROLLBAR=0" > /etc/X11/Xsession.d/80overlayscrollbars
set up the ethernet like described here http://askubuntu.com/a/333973 :
apt-get install fakeroot build-essential linux-headers-$(uname -r)
cd /usr/src/
mkdir compat_src
cd !$
wget http://www.kernel.org/pub/linux/kernel/projects/backports/stable/v3.9-rc2/compat-drivers-3.9-rc2-2-su.tar.bz2
tar xvjf !$:t
cd compat-drivers-3.9-rc2-2-su
wget https://gist.github.com/Germar/ea11bc1e998fee965f03/raw/5b1d28d42f0d4f2c4bf063002fde126becc61928/alx-patch.txt
patch --dry-run -p1 < alx-patch.txt
patch -p1 < alx-patch.txt
./scripts/driver-select alx
fakeroot make
make install
modprobe alx
to not loose ethernet after recovering from hibernate:
vi /etc/pm/config.d/modules
SUSPEND_MODULES="alx"
:wq!
after kernel upgrades you need to do this to get ethernet working again:
cd /usr/src/compat_src/compat-drivers-3.9-rc2-2-su/
fakeroot make
make install
modprobe alx
how to get the "Public" folder working:
right click on the "Public" folder -> sharing options -> select everything. as far as i remember it then asks to install samba. otherwise apt-get install samba smbfs. i also added user rights, so oneself can move the files from that public folder to somewhere else:
vi /etc/samba/smb.conf
add to the global section:
create mask = 0777
directory mask = 0777
:wq
service smbd restart
install some other useful tools
apt-get install ...
update 02.oct.
bumblebee setuplike here https://wiki.ubuntu.com/Bumblebee#Installation
Enable the Universe and Multiverse repositories in /etc/apt/sources.list
sudo add-apt-repository ppa:bumblebee/stable
sudo apt-get update
sudo apt-get install bumblebee virtualgl linux-headers-generic bbswitch-dkms
reboot
optirun glxgears
optirun works, also after suspend if you install bbswitch-dkms.
notes for virtualbox:
dpkg-reconfigure virtualbox-dkms
dpkg-reconfigure virtualbox
modprobe vboxdrv
modprobe vboxnetflt
please comment if you have some hints or solutions
Hi there, I am actually using the same laptop
AntwortenLöschenI know ubuntu thinks it is using intel gfx but it is not... even in your setup the orange light is hardware controlled not software controlled that being said you are still using the nvidia gfx... I confirmed this per the fact I can actually pull the temp of the nvidia chipset and it fluctuates based on activities on the laptop
hi gody
Löscheninteresting. i dont have neither any nvidia package installed nor nvidia kernel module loaded. so i dont think it runs on nvidia. do you have any nvidia packages installed or modules loaded?
as far as i understand optimus technology, there are some possibilities how the two cards are soldered together... but i just started with investigation on that topic. do you know more?
did you get external monitors working?
thanx and looking forward
ivo
With Bumblebee installed, does it work for you to use optirun and run a program with the discrete GPU? For me, I got that working on Ubuntu 13.04, but power management doesn't seem to be working.
LöschenFor now, as a general rule of thumb, I'm staying plugged into the wall when I have Ubuntu installed on my computer.
yep it worked. but to be honest, i dont need it. i'm now trying to find out how to be always with nvidia grafix. also opengl should be working permanent as i want to use gnome-shell. i tried with different nvidia drivers, but i either lack GLX or nvidia-tools do not recognice that i'm running nvidia...
Löschenbut with bumblee i got a more or less working gnome-shell. at least opengl worked with "optirun"...
has anyone managed to properly install the nvidia only drivers?
btw: i forgot to mention in my first answer, that i had "nouveau" drivers installed... but i missed GLX.
Löscheni installed the nvidia driver via jockey-gtk, but somehow they did not get activated. i installed also the 325.15 version from here: http://www.nvidia.com/object/unix.html . i installed it with booting up without X, but i dont know, seems like i have too many nvidia drivers installed somehow... i dont know how to really control which version is loaded and so on. needs further investigation. which ones are you using and how did you install them?
I got Bumblebee working as well with the Nvidia 331 drivers. I use the proprietary ones because they're better optimized than the open source Nouveau ones (although I hope that changes someday). I also have got power management with bbswitch working as well. Apparently, the Linux 3.8 kernel doesn't work properly with bbswitch. I upgraded the kernel version to one of the release candidates for 3.12 and it worked just fine.
LöschenI'll also be testing out multiple monitors soon. According to the Bumblebee docs, it looks like you have to keep the GPU on and edit your Xorg configuration. I'll play around and let you know what I find.
Did you try installing the nvidia related packages? Getting nvidia to work shouldn't be difficult. Getting Optimus (using bumblebee) might be more challenging.
AntwortenLöschenAlright so here is what my research revealed and it is alittle rough but as I have put the computer through its paces, the color on the power button is not so much software controlled per os as it is hardware controlled... that being said if it is glowing orange it is running the nvidia card... I have confirmed this because I have no nvidia packages installed but I do have a tempature gauge that measures the two gpus the nvidia ramps up in tempature on what I am doing on my computer... it appears the go to gfx solution is the nvidia as in what is preferred by the pc to run and then with optimus it turns off the nvidia and uses the haswell it can also be noted that ubuntu will detect as if it is using the haswell when in fact it is all being rendered per the nvidia gpu
AntwortenLöschenCan you detail how you got Optimus installed? I would like to be able to switch back and forth between the Haswell iGPU and the NVIDIA dGPU to get some battery life back.
Löscheni did not test with batterylife, when i installed it like described above, but as the gs70 isn't built for long lasting battery action, i prefer to have fullpower grafix always on. so i quit with bumblbee and researching on a proper nvidia-only setup. anyone?
Löschenlol I have been having issues with optimus as well I was just coming here to tell you, your using the nvidia gpu... but yes if I find anything about how to get it working I will come here and report to you... also I really appreciate your method for getting linux on it, mine requires me to switch between legacy and regular
AntwortenLöschenI tried to install the Nvidia Graphics to but its failed. Have somebody installed successfull the nvidia Graphic Card with HDMI support and so on?
AntwortenLöschenI haven't been able to spend a serious amount of time trying to get HDMI working, but from what the Bumblebee docs show, the graphics card will have to be always on, which means you can't take advantage of the power management features.
LöschenI can tell you that the webcam works fine with the drivers included with Ubuntu. External displays don't work perfectly without some tweaking of your X.org configuration from the Bumblebee documentation, but I haven't actually tested it yet.
AntwortenLöschenAs for Bumblebee, does Power Management work? What kind of battery life are you seeing now that you have Bumblebee installed?
I managed to get Linux Mint working using mostly this same setup. Grub repair freaked out on me when I attempted to encrypt / and swap.
AntwortenLöschenjust to let you know ubuntu13.10 works super nice. see latest post here for more information... was easy and all works like a charm.
AntwortenLöschenUse Fn-F6 to enable the webcam.
AntwortenLöschen